

12·
3 months agoWhy not?

No gods, no masters.
Why not?
Apparently, it’s a difficult letter in old typography, so it’s a marker for good quality work.
https://hitchhikers.fandom.com/wiki/Wonko_the_Sane
“Hold stick near centre of its length. Moisten pointed end in mouth. Insert in tooth space, blunt end next to gum. Use gentle in-out motion.”
—The toothpick instructions that convinced Wonko mankind in general was crazy.
Damn, it took me a minute to realize this was about erotic mods.

if ( parameters.teaMass <= TEA_BAG_WEIGHT ) {
    return "Error: incorrect input. Check if tea bag was inserted correctly into water container."
 }
Precisely.
This is a negative space meme. https://en.wikipedia.org/wiki/Negative_space
[[[[[[[[[ TEST ]]]]]]]]]
team Syncthing
why stop at curly brackets? Do all of them: parentheses, square brackets, angle brackets, and curly brackets. Also, strings should be liberated. Move all non-escaped quote characters to the end of the line too.
At least name it well. What’s tw supposed to mean?
<br>
actually:
<br>
but only sometimes.
Oldman.setHealth(“dicktits”); //normalize pls
0
Oldman.setHealth(“-100±1%”); //make percentage pls
Reject operations.
Use absolute number to remove the minus. Math.abs()
Oldman.setHealth(0.0); //it is subunitary, but undefined behavior - will it access the ‘numeric value’ overload, or the ‘subunitary numeric value’ overload?
Same result either way, so whatever if branch is first.
Understand the purpose. If you want to kill the old man with 0, then there’s no point to leaving it as 0.9%, understand the non-linear characteristics of life and death.
When you’re dealing with the low level functions, sure, you can keep it simple. When you’re reaching the surface of user input, you’re either going to waste time with validation and error reporting, or you’re going to waste time with interfaces that can handle more shit without complaining. There’s no fool proof either way, but good luck pissing users off with endless docs.
Don’t write your own code just yet.
If your goal in programming is just to be a traffic cop between the user input and the database, all you’re doing is building a virtual bureaucracy, the kind that people really hate and is easily generated with coding tools. Or you’re just deferring the “smoothing out” burden to the UI developers.
…ends with. And there are more ways to parse.
Absolute (cm)
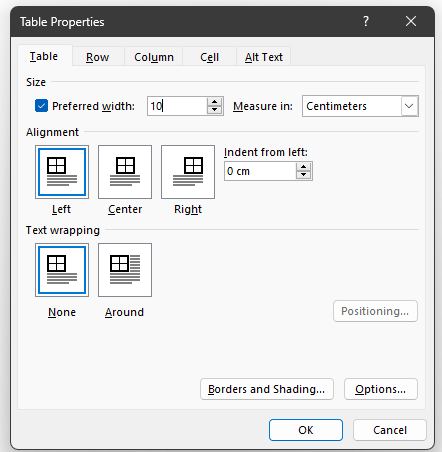
adding one 0:

100%, automatically changes unit to %
(Word table properties)
The high level setter function should be made to handle both string and numeric values.
If it contains “%” it’s a percentage value.
If it’s a string without a “%” it’s an absolute value and needs to be normalized.
If it’s a numeric value, it’s an absolute value.
If it’s a numeric 100, it’s 100%.
If it’s a subunitary numeric value, it’s a percentage.


The “trad wives” (traditionalist / paleoconservative middle class women who believe that their religion is good for women) are looking for a husband in the traditional sense, a type of business owner / patriarch who owns them and provides for them; see: husbandry. That’s so that they can produce a lot of offspring while pretending that raising kids in near or full homeschooling is a good thing and she’s very successful (culturally).
They’re the homologues of incels and traditionalist bros who want to be rich so that they maintain some informal harem. And they deserve each other.